Targets and messages | ||
| ||
The target/message system is in contrast to, for example, Motif’s callback mechanism. All widgets can send and receive messages from any other widget. A message consists of two components:
-
A message type
-
A message ID
The message type indicates what kind of event occurred; for example, clicking a button. The message ID identifies the sender of the message.
Most widgets in the Abaqus GUI Toolkit take arguments that specify their target and their ID. Even if a widget does not take a target and ID as arguments, you can set these attributes using the setTarget and setSelector methods. For example,
FXButton(parent, 'Label', tgt=self, sel=self.ID_1)

groupBox = FXGroupBox(parent)
groupBox.setTarget(self)
groupBox.setSelector(self.ID_2)
Widgets are capable of sending several types of messages. Two of the most common message types are SEL_COMMAND and SEL_UPDATE. The SEL_COMMAND message type generally indicates that a widget was committed; for example, the user clicked a push button. The SEL_UPDATE message is sent when a widget is requesting its target to update its state; for more information, see Automatic GUI updating.
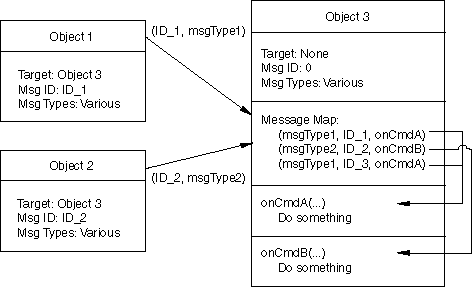
A message is routed to a message handler using a map defined in the target class. You add an entry in the map by specifying which method to call when a message of a certain type and ID is received. These concepts are illustrated in Figure 1.

The message map is defined by using the FXMAPFUNC function (see example below). This macro takes four arguments: self, message type, message ID, and method name. The method name must be qualified by the class name: className.methodName. When a message is received whose type and ID match those defined in an FXMAPFUNC entry, the corresponding method will be called. If you have a large range of IDs that you want to define in the message map, you can use the FXMAPFUNCS function, which takes one additional argument: self, message type, start message ID, end message ID, and method name.
Objects react to messages using message handlers. All message handlers have the same prototype, which contains the following:
-
The sender of the message
-
The message selector
-
Some user data
You can extract the type and ID of the message from the selector using the SELTYPE and SELID functions.
The following code shows how message maps, message IDs, and message handlers work together:
class MyClass(BaseClass):

    [
        ID_1,
        ID_2,
        ID_LAST
    ] = range(BaseClass.ID_LAST, BaseClass.ID_LAST+3)

     def __init__(self):

         BaseClass.__init__(self)
         FXMAPFUNC(self, SEL_COMMAND, self.ID_1,
             MyClass.onCmdPrintMsg)
         FXMAPFUNC(self, SEL_COMMAND, self.ID_2,
             MyClass.onCmdPrintMsg)

         FXButton(self, 'Button 1', None, self, self.ID_1)
         FXButton(self, 'Button 2', None, self, self.ID_2)

     def onCmdPrintMsg(self, sender, sel, ptr):

         if SELID(sel) == self.ID_1:
             print 'Button 1 was pressed.'
         elif SELID(sel) == self.ID_2:
             print 'Button 2 was pressed.'
         return 1
The previous example starts by generating a list of IDs for use in the derived class. Since a widget has a specific target, the ID of a widget does not have to be globally unique; it needs to be unique only within the target’s class and base classes. To handle this numbering automatically, the convention is to define ID_LAST in each class. A derived class should begin its numbering using the value of ID_LAST defined in its base class. In addition, a derived class should define its own ID_LAST as the last ID in the derived class. A class that derives from the derived class will then be able to make use of that ID to begin its numbering. ID_LAST should not be used by any widget. The only purpose of ID_LAST is to provide an automatic numbering scheme between classes.
The example continues by constructing a message map by adding entries using the FXMAPFUNC function. In this example, when a message of type SEL_COMMAND and an ID of ID_1 or ID_2 is received, the script calls the onCmdPrintMsg method.
The two button widgets have their target set to self (MyClass). However, when each widget sends a message, the widget sends a different message ID and the message handler checks the ID to determine who sent the message. For example, if the user clicks the first button, the button sends a (ID_1, SEL_COMMAND) message to MyClass. The class’s message map routes that message to the onCmdPrintMsg method. The onCmdPrintMsg method checks the ID of the incoming message and prints Button 1 was pressed.
It is important that your message handlers return the proper value to ensure that the GUI is kept up-to-date. Returning a 1 in a message handler tells the toolkit that the message was handled. In turn, if a message is handled, the toolkit assumes that something may have changed that requires an update, and the toolkit initiates a GUI update process. Returning a 0 in a message handler tells the toolkit that the message was not handled; therefore, the toolkit does not initiate a GUI update process.
Messages are normally sent by the GUI infrastructure as the result of some interaction in the GUI. However, you can send a message directly to an object by calling its handle method. The handle method takes three arguments: sender, selector, and userData. The sender is generally the object that is sending the message. The selector is made up of the message ID and the message type. You can use the MKUINT function to create a selector, for example, MKUINT(ID_1, SEL_COMMAND). The user data must be None since this feature is not supported in the Abaqus GUI Toolkit.