Beginning the bottom-up mesh | ||
| ||
Use the mesh controls tool
 to assign the bottom-up meshing technique to the unmeshable
region.
Abaqus/CAE colors the region light tan.
Select MeshCreate Bottom-Up Mesh from the main menu bar.
Tip: You can also click the  tool in the
Mesh module
toolbox. (For more information, see
Using the Mesh module toolbox.)
Abaqus/CAE displays the Create Bottom-Up Mesh dialog box and makes the unmeshed regions translucent. The degree of translucency is determined by the translucency slider, located in the Color Code toolbar (for more information, see Changing the translucency). In a more complex part, translucency allows you to select internal regions more easily.
Select the Sweep method, and click Select to the right of Source side.
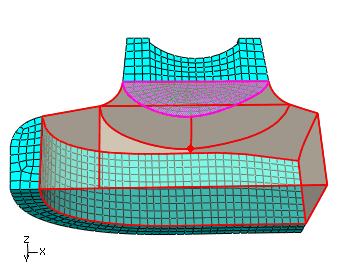
Select the semi-circular face at the bottom of the protrusion, colored magenta in Figure 1, as the source side of the first bottom-up mesh; and click Done in the prompt area.
You must change the default selection options to select the interior face (for more information, see Using the selection options).
Figure 1. Selecting a geometric face as the source side.
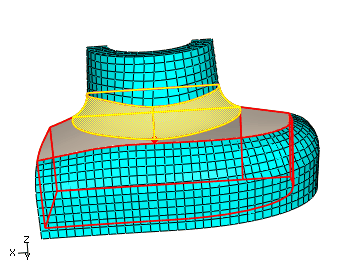
Tip: You can also choose two-dimensional elements or element faces as sides of a bottom-up mesh. In this case an alternative source side selection would be all the element faces on the bottom of the swept mesh. Toggle on Connecting sides, and click Select. Rotate the part as needed to select the three faces that represent the fillet between the top protrusion and the body of the part and the corresponding flat face on the front of the part, colored yellow in Figure 2.
Figure 2. Selecting the connecting sides.
Click Done in the prompt area to end selection.
Click Mesh in the Create Bottom-Up Mesh dialog box to create the mesh.
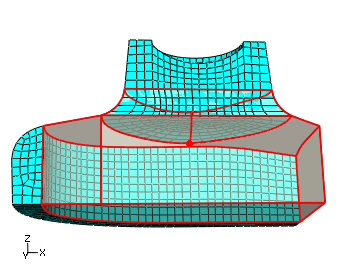
Figure 3. Bottom-up swept mesh of the filleted area.
The mesh extends approximately as far into the region as the selected connecting sides, the bottom-up region remains selected, and the Create Bottom-Up Mesh dialog box remains open for the next step.