Creating the shell representation of the beam | ||
| ||
Use the offset face
 tool to create shell faces for the vertical upper left side of
the beam.
Select faces from the reference representation to create the offset shell. Use Auto Select to select the target faces. The faces to offset and the target faces are shown in red and magenta, respectively, in Figure 1.
Figure 1. Selected faces to create the offset for the upper left side.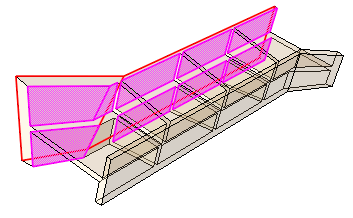
The faces to offset are the two outer vertical faces toward the rear. The target faces are the nine faces, mostly unconnected, that comprise the inner surface of the same beam wall. The Fraction distance to closest point on face method is used with an entry of 0.5 to create the offset with half the thickness of the thinner main portion along the top of the beam. Using this option prevents the thicker sections at the left and along the bottom of the beam from creating an offset larger than the thinner portion. The Auto trim to reference representation option is used for this step. This operation extends the faces during the offset process and then trims them along the edges of the reference representation. Auto trim may fail when multiple offset and target faces are selected; if auto trim fails, Abaqus/CAE displays a warning indicating the failure. You can use the extend faces tool to extend the new faces to meet the edges of the reference representation. The resulting offset faces are shown in Figure 2.
Figure 2. The resulting offset faces.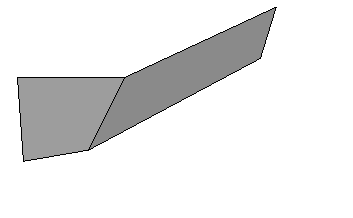
Repeat the process from Step 1 to create offset faces for the opposite side of the beam.
The resulting shell model now contains the two outer surfaces of the beam, as shown in Figure 3.
Figure 3. The offset faces from the first and second steps.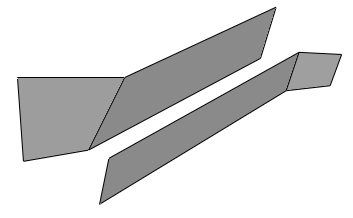
Create offset faces for the four horizontal sections that connect the two side walls.
You can create the faces in a single offset operation by selecting the four top faces to offset and using Auto Select to select the corresponding bottom faces. In this case Auto trim to reference representation is toggled off, so the new faces are not extended and trimmed. The shell model of the horizontal faces is shown in Figure 4. (The faces created in Step 2 have been suppressed for clarity.) Notice the gaps between the horizontal faces where they meet the vertical reinforcement ribs in the original part. Similar gaps exist between the horizontal shell faces and the side walls created in the previous two steps.
Figure 4. The horizontal offset faces.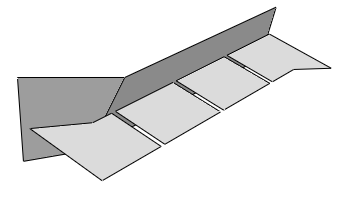
Repeat the process from Step 3 to create offset faces for the vertical ribs that connect the sides of the beam.
The midsurface shell model now contains faces representing nearly all of the solid geometry, as shown in Figure 5. However, there are gaps between most of the faces due to the thickness of the original solid structure.
Figure 5. The midsurface model with gaps between the faces.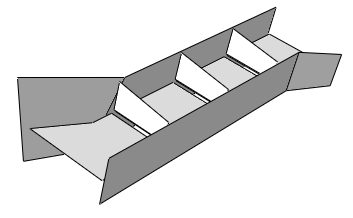
Close the gaps between the vertical ribs and the beam sides.
Use the extend faces
 tool to extend the six vertical ribs to intersect with the
sides. The selected faces and target faces are shown in magenta and yellow,
respectively, in
Figure 6.
Figure 6. Specifying the faces to extend and the target faces.
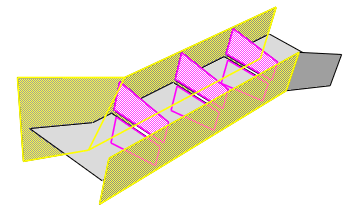
When you click OK, Abaqus/CAE updates the highlighting to indicate the edges along which the faces will be extended, as shown in Figure 7, and displays a warning dialog box with options allowing you to accept the selection, to extend all edges of the selected faces, or to cancel the extend faces procedure.
Figure 7. The edges where the vertical faces will be extended.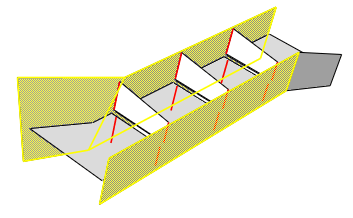
Use the extend faces
 tool to extend the horizontal faces to intersect with the sides
of the beam.
In this case, use the Specify edges of faces to extend method with Up to target faces to pick the edges and faces, respectively, shown in Figure 8. When Abaqus/CAE highlights the edges indicating the areas that will be extended, the four edges indicated by arrows in the figure are removed from the selection because they do not completely match the target faces. Click No to use the previous selection of edges.
Figure 8. The edges along which the horizontal faces will be the extended.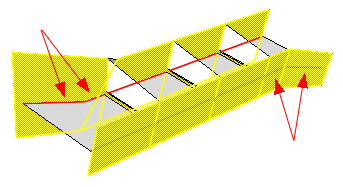
Close the remaining gaps between the horizontal and vertical connecting sections of the beam. You can use either the blend faces
 tool or the extend faces
 tool to complete the midsurface model by closing the remaining
gaps between the horizontal and vertical connecting sections of the beam.
-
Use the extend faces
 tool with the selections shown in
Figure 9.
Toggle on Trim to extended underlying target surfaces so that Abaqus/CAE will extend and trim the vertical faces to their implied intersections with the selected target face.
Figure 9. Filling the gaps between the vertical reinforcing ribs.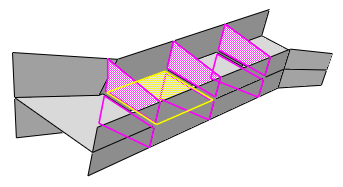
-
Use the blend faces
 tool to fill the remaining gaps.
The tool must be used three times to fill the three remaining gaps in the model.
-
Use the extend faces